2 - Drivetrain
Drivetrain Types
- Tank
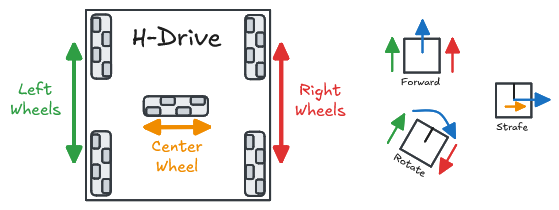
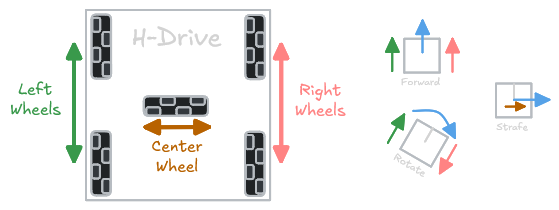
- H-Drive
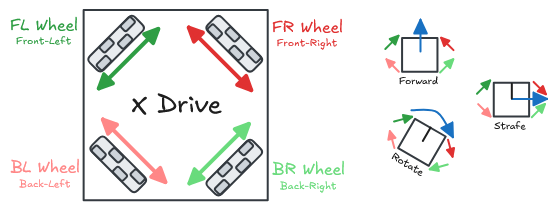
- X-Drive
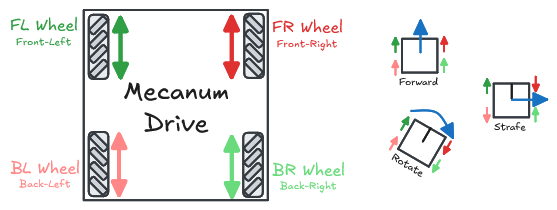
- Mecanum
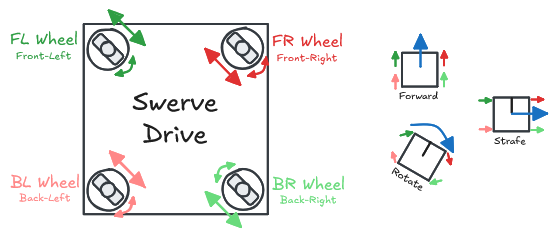
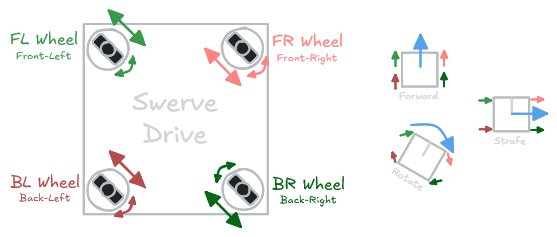
- Swerve
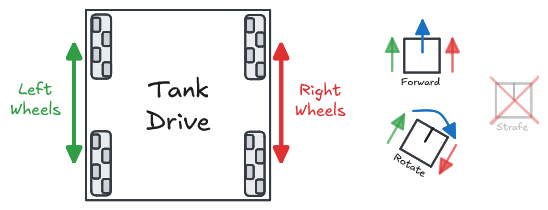
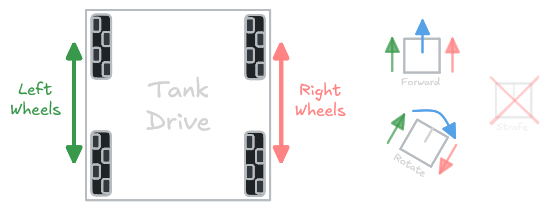
Tank drive is one of the most common drivetrain configurations due to its ease of use, reliability, and minimal complexity. It works by utilizing 2 sets of wheels on each side of the robot. These wheels can be traction wheels, omni wheels, or a combination of multiple types.
- The robot can move forward/backward by moving the wheels forward/backward
- The robot can rotate by moving the wheels opposite of each other.
| Pros ✅ | Cons ❌ |
|---|---|
| - Simple - Full power/traction | - No strafe 😞 |
Example Code
// Define SmartMotorGroups for left and right motors
SmartMotorGroup leftMotors = SmartMotorGroup("LeftMotors", {1, -2, 3});
SmartMotorGroup rightMotors = SmartMotorGroup("RightMotors", {-4, 5, -6});

// Create a TankChassis using the defined motor groups
TankChassis chassis = TankChassis(leftMotors, rightMotors);
// Define SmartMotorGroups for left motors, right motors, and center motor
// (SmartMotorGroups can just have a single motor)
SmartMotorGroup leftMotors = SmartMotorGroup("LeftMotors", {1, -2});
SmartMotorGroup rightMotors = SmartMotorGroup("RightMotors", {-3, 4});
SmartMotorGroup centerMotor = SmartMotorGroup("CenterMotor", {5});

// Create an HDriveChassis using the defined motor groups
HDriveChassis chassis = HDriveChassis(leftMotors, rightMotors, centerMotor);
// Define SmartMotorGroups for each corner
// (SmartMotorGroups can just have a single motor)
SmartMotorGroup frontLeftMotor = SmartMotorGroup("FrontLeftMotor", {1});
SmartMotorGroup frontRightMotor = SmartMotorGroup("FrontRightMotor", {2});
SmartMotorGroup backLeftMotor = SmartMotorGroup("BackLeftMotor", {3});
SmartMotorGroup backRightMotor = SmartMotorGroup("BackRightMotor", {4});

// Create an XDriveChassis using the defined motor groups
XDriveChassis chassis = XDriveChassis(
   frontLeftMotor,
   frontRightMotor,
   backLeftMotor,
   backRightMotor
);
// Define SmartMotorGroups for each corner
// (SmartMotorGroups can just have a single motor)
SmartMotorGroup frontLeftMotor = SmartMotorGroup("FrontLeftMotor", {1});
SmartMotorGroup frontRightMotor = SmartMotorGroup("FrontRightMotor", {2});
SmartMotorGroup backLeftMotor = SmartMotorGroup("BackLeftMotor", {3});
SmartMotorGroup backRightMotor = SmartMotorGroup("BackRightMotor", {4});

// Create an MecanumChassis using the defined motor groups
MecanumChassis chassis = MecanumChassis(
   frontLeftMotor,
   frontRightMotor,
   backLeftMotor,
   backRightMotor
);
| Pros ✅ | Cons ❌ |
|---|---|
| - Full power/traction in every direction - Complete meneuverability | - Mechanically complex - Requires 8 motors and 4 potentiometers |
// Define DifferentialSwerveModules for each corner

// Front Left Module
SmartMotorGroup frontLeftMotorA = SmartMotorGroup("FrontLeftMotorA", {1});
SmartMotorGroup frontLeftMotorB = SmartMotorGroup("FrontLeftMotorB", {2});
ADIAnalogIn frontLeftPotentiometer = ADIAnalogIn("FrontLeftSensor", 1); // <-- potentiometer to track the rotation of the module

DifferentialSwerveModule frontLeftModule = DifferentialSwerveModule(
   frontLeftMotorA, frontLeftMotorB, frontLeftPotentiometer
);

// (Repeat for each module)
// ...

// Create an SwerveChassis using the defined swerve modules
SwerveChassis chassis = SwerveChassis(
   frontLeftModule, frontRightModule, backLeftModule, backRightModule
);
Mecanum, swerve, X-drive, and H-drive are all known as holonomic drivetrains. That is, they can move forwards, backwards, and sideways.
Controls
- Arcade
- Split Arcade
- Tank
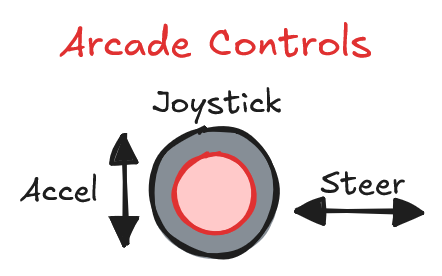
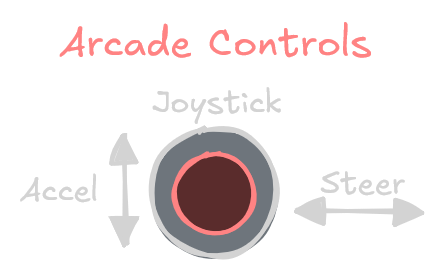
Arcade controls allow the robot to be driven using a horizontal and vertical joystick input.
void opcontrol() {
    while (true) {
        // Move chassis based on joystick inputs
        chassis.move(
            mainController.leftY,  // Forward/backward speed [-1.0 to 1.0]
            mainController.leftX,  // Turning speed [-1.0 to 1.0]
            0
        );

        // ...
    }
}
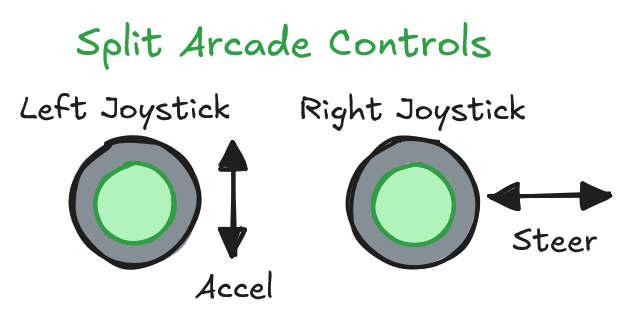
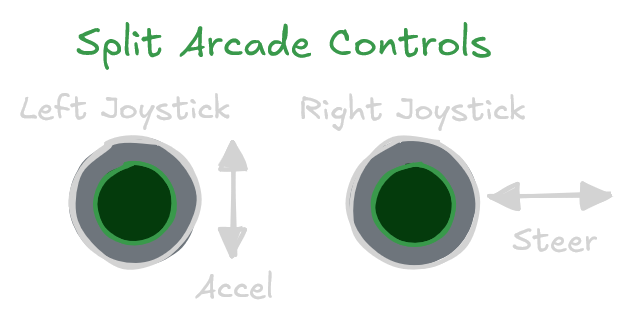
Split arcade controls are similar to arcade, but split across 2 different joysticks. This allows the driver to use both hands when driving the robot at the expense of an additional joystick input.
This is often more familiar to drivers since it mimics popular video games that use the left joystick for movement and the right joystick to aim/look.
void opcontrol() {
    while (true) {
        // Move chassis based on joystick inputs
        chassis.move(
            mainController.leftY,  // Forward/backward speed [-1.0 to 1.0]
            mainController.rightX, // Turning speed [-1.0 to 1.0]
            0
        );

        // ...
    }
}
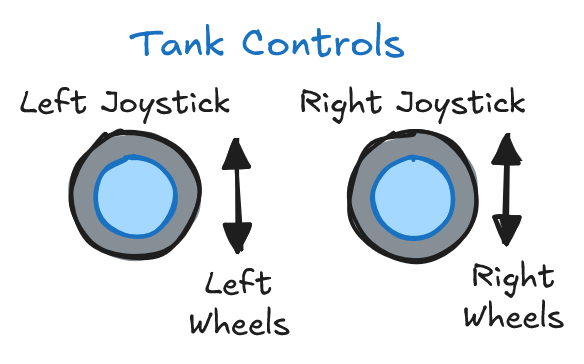
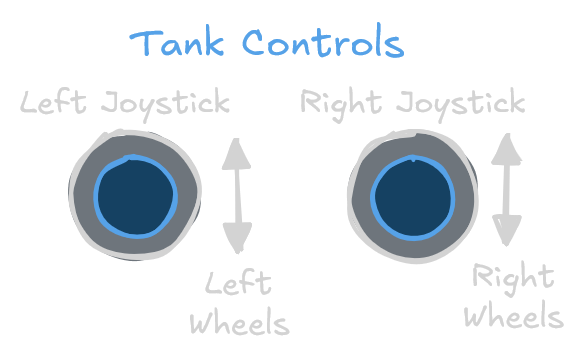
This is only applicable to a tank drive chassis.
Tank controls allow the robot to be driven using two separate joystick inputs for the left and right sides. This gives the driver more direct control over the drivetrain, but is less intuitive to use.
void opcontrol() {
    while (true) {
        // Move chassis based on joystick inputs
        chassis.moveTank(
            mainController.leftY,  // Left forward/backward speed [-1.0 to 1.0]
            mainController.rightY  // Right forward/backward speed [-1.0 to 1.0]
        );

        // ...
    }
}
Joystick Curving
By default, joystick inputs are linear. This means that if you push the joystick halfway forward, the robot will move at half speed. However, this can make it difficult to control the robot at low speeds since the window for input values is very small. DevilLib includes built-in support for curving joystick inputs to give the driver more control at low speeds.
You can read more about this in the joystick curving guide.