4 - Odometry
Odometry is "the use of data from motion sensors to estimate change in position over time." (Wikipedia)
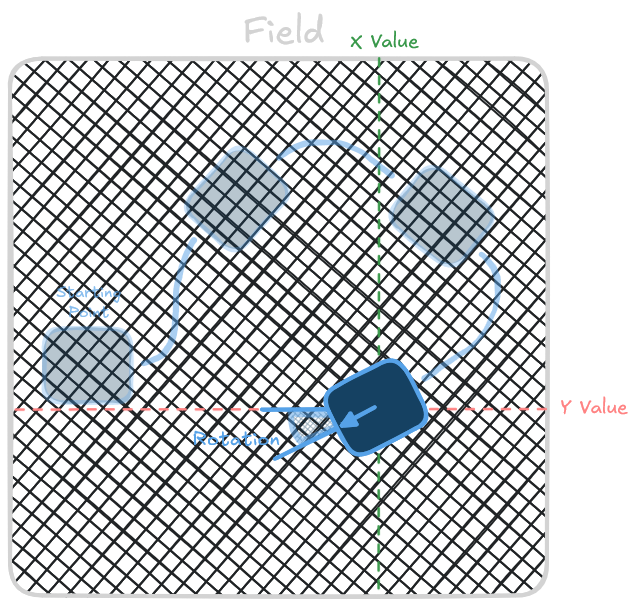
Odometry allows the robot to know where it is on the field at any given time. This enables the robot to automagically correct itself if it drifts off it's autonomous course.

How do?
Theres a huge variety of methods for calculating the odometry, each with their own strengths and weaknesses.
- Drivetrain Encoder
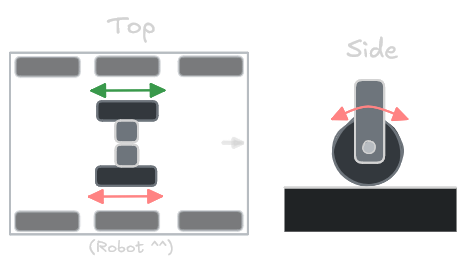
- Parallel Dead Wheels
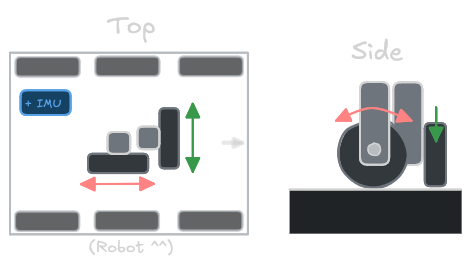
- Perpendicular Dead Wheels

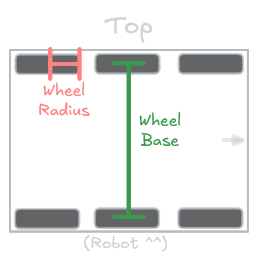
The easiest solution is to use the encoders that are also built in the robot's drivetrain. By tracking how much the wheels of a robot rotate, we can use trigonometry to figure out how far the robot has driven from its starting point.
This method relies on the drive wheels having good contact and friction with the ground which is almost never the case. Drive wheels can and will slip a significant amount during the course of an autonomous run.
DO NOT rely on this method for long or complex autonomous routines.
If you're going to use this method, keep the robot slow, minimize sharp accelerations/turns, and use an IMU to help.
Example Code
// Make sure there is a tank chassis defined
TankChassis chassis = TankChassis(leftMotors, rightMotors);

// Define the radius of the drivetrain wheels (in inches)
static constexpr float WHEEL_RADIUS = 1.0f; // in

// Define the distance between the left and right drivetrain wheels (in inches)
static constexpr float WHEEL_BASE = 12.0f; // in

// Create a Tank Chassis odometry object
// (Since TankChassisOdom is an AsyncTask, we must use a shared pointer)
std::shared_ptr<TankChassisOdom> odom = std::make_shared<TankChassisOdom>(
    chassis,
    WHEEL_RADIUS,
    WHEEL_BASE
);

MyRobot() {
    odom.setTicksPerRevolution(300); // <-- Change based on your robot's gear ratio

    // ...
}

// Define rotation sensors for odometry wheels
RotationSensor leftOdomWheel = RotationSensor("LeftOdomWheel", 10);
RotationSensor rightOdomWheel = RotationSensor("RightOdomWheel", 11);

// Define the radius of the dead wheels (in inches)
static constexpr double DEAD_WHEEL_RADIUS = 1.0; // in

// Define the distance between the left and right odometry wheels (in inches)
static constexpr double DEAD_WHEEL_BASE = 12.0; // in

// Create a parallel sensor odometry object
// (Since ParallelSensorOdometry is an AsyncTask, we must use a shared pointer)
std::shared_ptr<ParallelSensorOdometry> odometry = std::make_shared<ParallelSensorOdometry>(
    leftOdomWheel,
    rightOdomWheel,
    DEAD_WHEEL_RADIUS,
    DEAD_WHEEL_BASE
);
// Define rotation sensors for odometry wheels
RotationSensor verticalOdomWheel = RotationSensor("VerticalOdomWheel", 10);
RotationSensor horizontalOdomWheel = RotationSensor("HorizontalOdomWheel", 11);

// Define the radius of the dead wheels (in inches)
static constexpr double DEAD_WHEEL_RADIUS = 1.0; // in

// Create a perpendicular sensor odometry object
// (Since PerpendicularSensorOdometry is an AsyncTask, we must use a shared pointer)
std::shared_ptr<PerpendicularSensorOdometry> odometry = std::make_shared<PerpendicularSensorOdometry>(
    verticalOdomWheel,
    horizontalOdomWheel,
    DEAD_WHEEL_RADIUS
);
Rotational Compensation
When the robot rotates, the perpendicular orientation of the odometry wheels can inadvertently cause lateral movement readings. To correct for this, you can set the offsets of the odometry sensors relative to the robot's center of rotation.
These are defined as Vector2 objects, where the x-coordinate represents the horizontal offset (left/right) and the y-coordinate represents the vertical offset (forward/backward).
You may have to manually tune these values based on the position and grip of your odometry wheels.
// Offset values for the odometry sensors, relative to the robot's center of rotation (in inches)
Vector2 verticalSensorOffset = Vector2(-0.5, 0);    // (Y position is disregarded)
Vector2 horizontalSensorOffset = Vector2(0, 1);     // (X position is disregarded)

MyRobot() {
    // Apply the offsets for odometry calculations
    odometry.setSensorOffsets(verticalSensorOffset, horizontalSensorOffset);

    // ...
}
Usage
Odometry provides the current heading and position of the robot on the field as a Pose object.
The Pose provides x and y coordinates (in inches) representing the robot's position, as well as a heading (in degrees) representing the robot's orientation.
void opcontrol() {
    while (true) {
        // Get the current pose of the robot
        Pose pose = odometry.getPose();

        // ...
    }
}
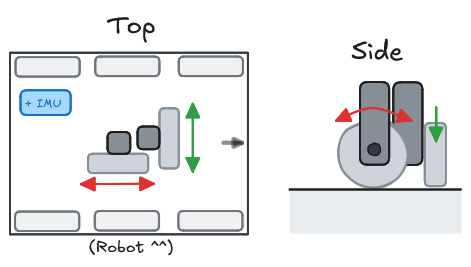
Inertial Sensor
An Inertial Sensor (IMU) can be used to improve the accuracy of odometry calculations by providing accurate orientation data that drifts significantly less over time. While optional, it is highly recommended to use an IMU for the best performance.
// Define the Inertial Sensor
InertialSensor imu = InertialSensor("IMU", 15);

MyRobot() {
    // Use the IMU for odometry calculations
    odometry.useIMU(&imu);

    // ...
}